How to edit Your restaurant’s menu in Google Business Profile
Restaurant and other business owners and operators alike can effectively customize and add their menu to their Google Profile listing. It’s a free and easy way to increase your online presence, build brand awareness and give your customers more access to your menu. Here’s all the information you need.

Satisfy customers’ appetites by adding your menu to your restaurant’s Google Business Profile listing
Do you look up a restaurant’s menu already knowing what you’re going to order? Or sometimes you choose between restaurants based on their menus? Well, it turns out you’re not alone! Both are common practices. And Google trends’ data shows "menu" related searches have increased significantly in the last four years.
Optimizing your restaurant’s search ranking by using the right keywords, making sure your business listing is up to date and responding to online reviews will go a long way toward building brand awareness. Like you, your customers want to see what you’re selling—and handing them an online menu just got easier.
Google Business Profile has a functionality that lets business owners add their own structured menu and showcase it directly on their Google business listing.
It can be done in the dashboard with the rest of your business’s information. Just follow these easy, step-by-step instructions.
Step 1: Claim your business listing on Google
Chances are there’s already a Google Business listing for your restaurant, but if not, creating one is a breeze. Simply go to business.google.com, sign in with an existing Google account and search for your business.
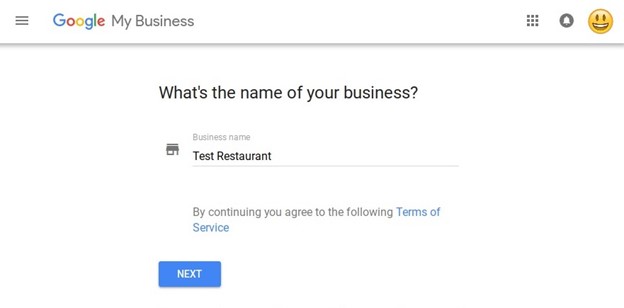
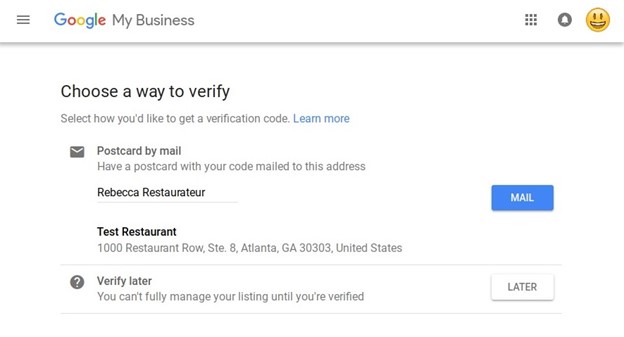
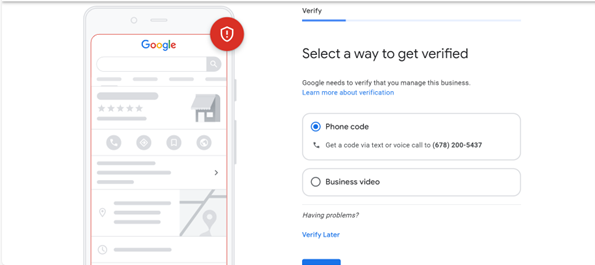
Once you’ve selected your business’s name, category, phone number and website, you’ll be prompted to verify your listing before any edits are published. To verify you are an actual representative of your establishment, Google will send a video code or schedule a business video ensuring the information you provided is accurate. Note: Your business must be verified before any edits to your business listing can be published.
Step 2: Customize your listing
While you wait for your verification card to arrive (it takes about 5 days), you can go ahead and customize the information on your business listing, including your menu. In your dashboard, select your restaurant’s listing and click “Edit.” From there, you can add your hours of operation, a link for reservations or online ordering, photos and other business attributes.
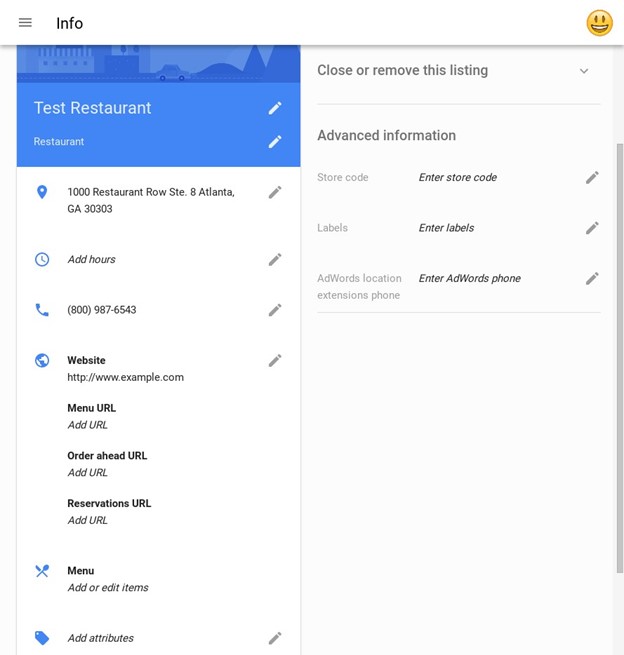
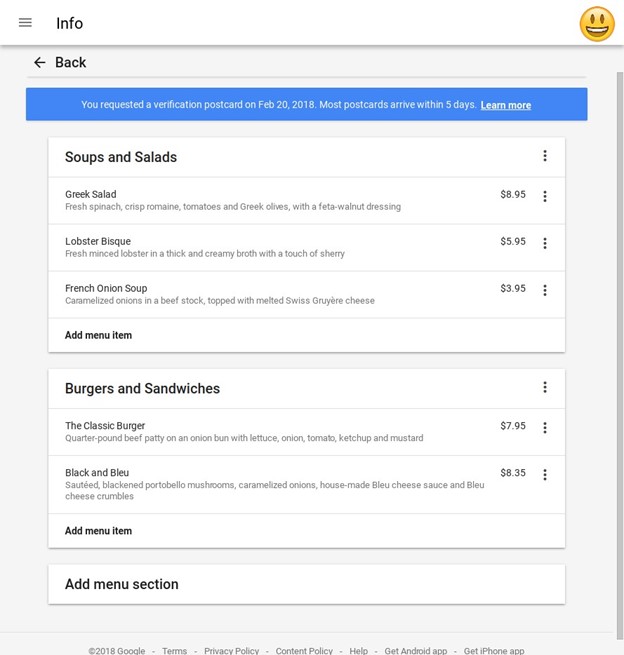
Step 3: Create your menu
To add or edit menu items, click “Menu.” From there, you can create sections to organize your menu by course or create a dedicated section to showcase current special offers. Under each section, add the name, description and price for the various dishes you serve in that category.
Note that the menu editor is only available for businesses that are not already using a third-party menu provider and in English-speaking locales. Other businesses, such as a barbershop or spa, can use this section to list a menu of services offered.
Step 4: Double-check for accuracy
Your restaurant’s listing on Google is often a consumer’s first impression of your restaurant, so make sure it’s accurate and complete. Incorrect or inconsistent information makes it hard for customers to reach you—which can hurt your ranking in search results.
Google’s goal is to make finding information and taking action as easy as possible. Because of that, links to certain third-party online ordering or reservation services may automatically appear on your Google listing and can’t be edited in Google My Business. See this help center article for more information on how to correct or remove an incorrect link.
Step 5: Add some flair
While you’re working on your listing, boost your restaurant’s appeal by listing amenities (such as free Wi-Fi or free parking), adding photos of your establishment and sharing videos that tell your brand’s story.
And, voilà! You’re ready to publish your restaurant’s listing (once you’ve completed the verification process, of course). Now it’s time to start ushering in more hungry patrons!